General
Using Potion Lab
Potion Lab is our attempt at giving brewers and baristas a fun, accessible way to experiment with mineral composition.
Currently Potion Lab is in a prototype stage and is available on a case-by-case basis. Each Potion Lab is built carefully by hand with love.
The most recent prototype looks something like this:
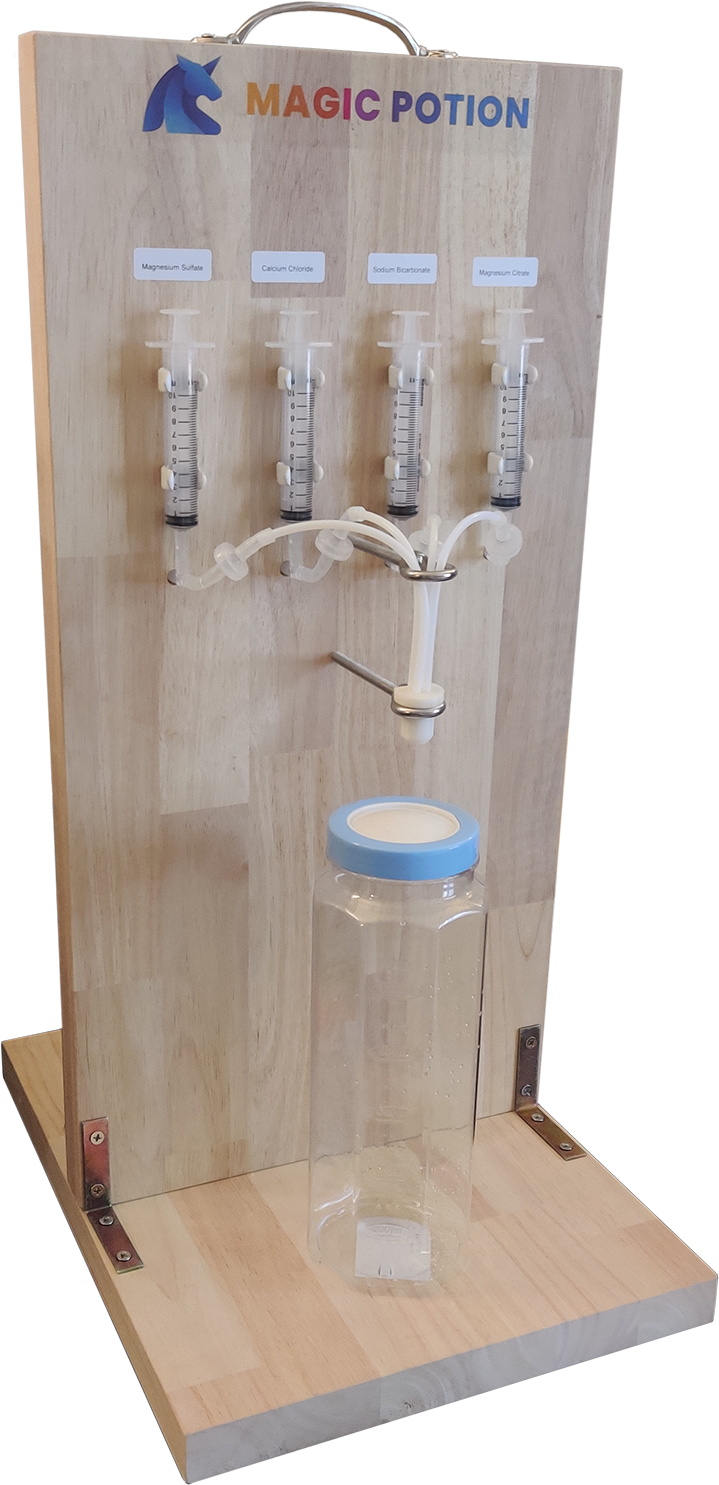
We intend to produce kit-set versions at a later date that can be shipped and assembled by yourself.
How does it work?
Potion Lab is a liquid dosing and delivery system.
It allows you to accurately and conveniently dispense volumes of four source mineral solutions, which can then be diluted in RO water to create your brewing water.
In our experience, the best four source substances to use are:
- Magnesium sulfate
- Calcium chloride
- Sodium bicarbonate
- Magnesium citrate
You can't see it in the picture above, but these are in bottles on the other side.
You can use our calculator tools at Potion Lab Tools to take the amounts you use and calculate the composition of your brew water. Our calculator allows you to understand the full mineral composition of the water, with summaries of several key factors:
- Magnesium, calcium and sodium concentrations
- Acid buffering
- Total ionic strength
Being founded by a chemist, we use chemistry terms that are standardised like molar concentrations - particularly avoiding things like alkalinity in units of CaCO3 (so old and archaic!). However we do include mg/L concentrations in our summary table, since many are more familiar with these.
Where can I buy it?
Right now we are making prototypes on a case-by-case basis as demand arises, so do not have it listed on our Lazada Store.
Current prototypes are priced at 5,000 THB but this price will be raised to 10,000 THB once we have finalised the end product, which will be even more polished and premium.
All Potion Labs come fully assembled and can be picked up in Bangkok (currently not posting them), and come with 3 sachets of each powder (magnesium sulfate, magnesium citrate, sodium bicarbonate, calcium chloride).
We're happy to deliver within downtown Bangkok and demonstrate usage, setup etc.
Interested in buying?
If you are interested in buying a Potion Lab, please reach out to us on Facebook or Instagram.
Using the Potion Lab
Have a Potion Lab and ready to get started? Below you can find details on how to use it and general care.
Getting the Potion Lab ready
First time use
If it's your first time using the Potion Lab, we recommend first connecting all the rear tubes into an open bottle with RO water. Make sure to always keep your tubes clean and only ever use RO water, or our standard solutions, in the Potion Lab device.
Once all the tubes are in RO water, gently but firmly pull each syringe up to ~11 mL, then firmly and slowly press it down to push water out the head unit.
Do this 4-5 times to prime the unit, flushing it with clean water, and removing air bubbles in the process.
Do this for all the syringes.
Once it is primed, you can switch all tubes to their respective source bottles. Now, repeat this process ~3 x per syringe to fully prime the tubes with the mineral stock solutions.
Be firm but gentle
When pulling and pushing on syringes, you wil need to exercise some strength but do not push/pull rapidly. Doing so can wear out the syringe seal. The water is under pressure, so do not aim for speed.
Daily use
If you go to use the Potion Lab at the start of your day, or after many hours with no use, we recommend priming each syringe once.
Air bubbles can gather over time and by priming, you remove these and can avoid doing a precise measurement only to find a big pocket of air gets in the way.
There is no need to flush the system with RO water daily or remove the tubes from the stock solutions.
Creating bespoke mixes
Now that you have a Potion Lab, you have freedom create almost any combination of magnesium, calcium, sodium, acid buffering and total mineral content.
You can use our Potion Lab Tools to calculate your results and for guidance (we will add recipes here).
In general, you will need to experiment, and our tools above provide indicators, goal ranges and note when any particular ion is very high or low.
Here are some handy bullet points to go by:
- Overall ionic strength is the best indicator of how extraction intensity will increase
- Acid buffering controls the acidity in your brew. Keep it low in black coffee to let fruity, acidic flavours shine, and raise it for milk coffee where you want to focus on nutty, chocolate and caramel flavours
- Magnesium has the biggest impact on extraction strength and flavour. Add more to make brews more intense (which you can do through a combination of magneisum sulfate and citrate)
- Calcium seems to improve mouthfeel and also increases extraction, but in our experience over 0.5 mM (20 mg/L) starts to enhance cereal, wheaty flavours that we don't enjoy so much
- Sodium is perfect at ~0.45 mM (10 mg/L) and is always useful to have. Adding high levels of sodium can however reduce our sensitivity to subtle flavours. This can help reduce roasted/bitter flavours (so can be useful for smoothing out dark coffee)
- Do not worry about whether your acid buffering comes from bicarbonate or citrate. They will give similar end results.
- High sulfate levels (over 0.7 mM, 70 mgL) seem to enhance roast flavours so can be useful in milk coffee
Feel free to reach out if you want help or guidance, and bounce around ideas with other Potion Lab users. Experience is the best teacher.
Refilling the stock solutions
This will happen pretty often for the active wizard!
You can buy additional mineral packets from Magic Potion on our Lazada store.
Our packets contain a very accurately weighed dose of each compound so that you can easily make your replacement mixes.
These substances are also carefully sourced, so you don't need to worry about the safety or quality of what's going into your water.
Simple rinse out your old bottle, tare it on a set of scales, then add all the powder from the sachet and top up to 1000 g/mL of RO water. Make sure to use a bit of RO water to rinse precious powder out of the packet.
Care and maintenance
Your Potion Lab is pretty sturdy, but we would advise being gentle and careful with the syringes. We have included some spares in case seals degrade.
Syringe replacement
Changing syringes is easy – just grab the syringe near each clamp and firmly pop it out (you won't break the clamps, they are very sturdy).
Then, you can push a new syringe into the silicone tubing connector, rotate it so the numbers face the right way, and carefully line it up with the others (so they are parallel vertically) and push it into the clamps.
Moving the Potion Lab
If moving the Potion Lab, firstly take care as it's quite heavy! We will improve the handles over time, just exercise caution carrying a heavy object as usual.
Make sure to secure the straps around the stock solutions when moving to avoid any accidents.
Removing air
Air can be annoying. It accumulates in the tubes and gets in the way of careful measurments.
There's nothing you can do to prevent this air appearing - not unless you live in a vaccum. However, you can proactively prime/purge your syringes before use to reduce the irritation.
To purge extensively, you can pop a syringe out of its clamps then rotate it to be upside-down, so that the tubing is all above the syringe. Now when you draw liquid and press it out, all air will rise up and be purged.
This is much more effective, but we wouldn't recommend it as it can be quite fiddly to pop the syringes out and rotate things amidst all the other tubing. This is a veteran's exercise!